Author: Alorous
17 October 2022 08:58
Community: DIY!
Tags: paper paper boat video boat do it yourself photo
24354
8
7
A paper boat is a wonderful craft! It develops fine motor skills (if you fold crafts carelessly, you won’t get a boat), it trains spatial thinking wonderfully, and besides, you can go outside and play with the resulting boat!
0
Source:
See all photos in the gallery
Alone, in the company of friends, with parents. Organize a sea expedition or speed race. Boats can be made from colored paper, painted and painted, and a crew of small toys can be selected for them. In bad weather, you can launch boats in the bathroom, and in the country - in a basin... In a word, practice with these schemes, and you won’t regret it!
Ship with sails
But such a boat, on the contrary, for some reason is not popular among Russian children. Making a romantic boat with sails is not at all difficult; moreover, we found two ways that lead to the same result. It should be noted that such a boat does not sail very well, but it looks beautiful, and on our streams it is also fresh and unusual!
0
Source:
0
Source:
* Advice - when watching the video, turn off the sound, for some reason during this particular filming, someone was diligently torturing musical instruments in the background.
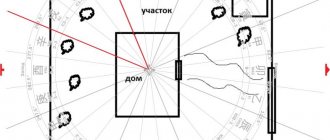
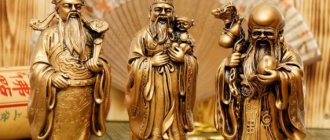
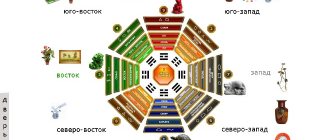
Where to put a money sailboat
Every owner wants wealth to flow into the house, and not float out of it. Therefore, any Feng Shui symbols must be placed correctly. When positioning a money ship, its nose should be directed toward the interior of the home. The sailboat is installed as if it were sailing towards you. Do not turn it towards the door or window so that your material well-being does not leave you.
It is not uncommon to find sailboat souvenirs in bottles. This option will not help you get rich. Such a symbol means the end of the road, dead-end hopelessness.
According to Feng Shui, a money ship can be located near the front door (do not forget about its nose, looking inside the house!). Such a situation means the arrival of all kinds of benefits from outside. The location of the sailboat in the northeast of the home in the Knowledge zone or in the southeast in the Wealth zone is favorable.
As a rule, the symbol of wealth is one single ship, and not an entire sailing flotilla, but there are exceptions. Sometimes one room is filled with several sailboats of wealth. They symbolize various sources of income that flow into the house in different directions.
The Feng Shui symbol of wealth is activated when using the color red. You can use red fabric for the stand, tie a bright scarlet ribbon or red thread to the mast, and paint the sails scarlet. The sailboat may contain a note wishing you financial success, coins of various denominations, banknotes and jewelry. According to the teachings of Feng Shui, not only a model of a ship, but also any painting depicting a sailboat will be an excellent money talisman.
Tricky boat
0
Source:
The design of this boat is called "Tricky boat", which sounds a little like the word "trick". The name can indeed be translated as “cunning, tricky, confusing.” Well, it’s not for nothing that it got such a name! After sitting over the diagram for a good half hour, the author was still unable to fold the boat.
Fortunately, a video was found on the Internet, and the complex immediately became simple. We must warn you, for the first minute and a half the piece of paper is simply crumpled and smoothed in all directions (apparently this is a necessary condition for performing an ingenious trick), but then the real magic begins!
Ship model template
Let's start the work by drawing the ship templates. We have found ready-made templates; if you wish, you can make changes or corrections to the appearance of the case, contour or size. But if you make changes to any part, you will have to adjust all the others.
The presented templates can be printed on A4 sheets, or you can try to redraw them from a computer screen by changing the scale - this way you can enlarge or reduce the ship.
We use cardboard with a thickness of 4 mm, but for the part marked in orange (the bottom line of the ship), you will need to glue two layers together, obtaining a thickness of 8 mm.
The following steps are intended for those who develop the template themselves: draw the central part of the ship on an A3 sheet, as well as the deck (top view). To give the model volume, you need to take care of its central part (stiffening ribs, and they should not be the same). They can be made according to the example shown in the photo below.
We divide it into several simple parts. We cut it out of paper - these will be our templates.
Now we transfer all the details onto cardboard and cut them out.
For those who will use a ready-made template, download it here:
Details
Add a few more details to the sides of the ship: small strips of cardboard that cover the “seams”:
We also cut out round portholes in the form of a torus with a diameter of 2.5-3 cm (inner diameter 1 cm).
You can also add more square windows.
Manufacturing process
So, let's start creating.
- Take a landscape paper sheet, white or any other color of your choice.
- Folds in half to form a rectangular shape.
- One of the corners is bent into the center of the rectangle.
- Fold the adjacent corner on the opposite side in the same way.
- We bend the lower part to the top.
- Now turn the figure over.
- Fold the rectangle from the bottom upward.
- Tuck the resulting ends in and fix them inward.
- A diamond shape has formed.
- Next, lift the corner from below to the top.
- You need to turn it over again and do the same on that side.
- Lift the pointed corner at the bottom to the top.
- Next you need to get a rhombus by folding the triangle into the center.
- Start forming the boat by pulling the ends.
- Shape the bottom of the vessel so that it becomes voluminous and stable.
Ready!
Stones
The ship itself in the form in which it turned out is not stable and will not stand. Therefore, for its basis we will make riffs from egg packaging. Let's divide it into separate modules of irregular shape and glue them again in random order.
Ship's skeleton - operating procedure
We use hot melt glue for gluing; of course, adults will use this tool.
So, parts A, B, C, D, E are parts of the central part of the ship. Parts 1, 2, 3, 4, 5 are “stiffening ribs” and they must be glued perpendicular to the central parts (marked in different colors in the first picture).
The orange bottom piece serves as the base for the entire ship.
If you have difficulties assembling the model from parts, refer to the first template, which indicates which parts of the ship should be attached where.
Now let's move on to forming the side part of our vessel. We cut strips 15 mm wide from thinner cardboard. The length of the strips depends on the length of the entire vessel (can be measured from bow to stern).
Each subsequent strip is glued on top of the previous one so that there are no gaps.
We have an almost finished ship: the side part looks so much like old boards!
Using the green template parts a, b and d, we outline the railing (top view, see photo). The width is 15 mm, but they can be made wider or narrower. These parts should be thicker, so we cut out 2 upper and lower parts and glue them together.
The balusters at the railing are small narrow strips measuring 30x5 mm, glued together in 3 pieces.
There should be 4 parts of the railing in total: 1 triangular - this is the bow of the ship, two on the sides and 1 in the form of a trapezoid - at the stern of the ship. We fix the railing parts to the frame of the ship with glue.