This article shows you how to make a beautiful collection of dried insects.
Previously, there were many collectors of dried insects. Almost every third person tried to preserve a beautiful butterfly or some kind of beetle, for example, between the pages of an old book. Naturally, there are still real collectors today, despite the projects of Greenpeace and other environmentalists. But still, the real keepers of rare specimens remain.
If you decide to start creating collections of dried insects, then read the information below. Here you will find answers to questions about how to do it correctly in stages, as well as how to register and much more. Read on.
What is the name of the collection of dried insects and butterflies?
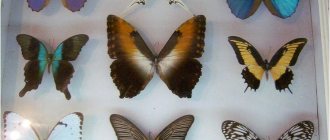
Collection of dried insects, butterflies
A collection of dried insects is called an entomological collection. It should be noted that specimens are pinned with a special pin and selected for certain distinctive features. They are stored in special boxes. Collecting butterflies is called lepidopterophilia.
Do not under any circumstances call an entomological collection a herbarium, since this concept applies only to plants.
How to catch insects for collection: recommendations
Catching insects for a collection
Collecting an entomological collection is possible only for the purpose of expanding the knowledge of young naturalists. As for chasing insects for fun, this is strictly prohibited. In general, children collect butterflies, beetles and other common insects that can be encountered during walks. How to catch insects for collection?
Here are important nuances and recommendations for a young or adult collector:
- You should not dress in the latest fashion - clothes should be simple and comfortable.
- Particular attention should be paid to shoes. Ideally, it should protect your feet from cold and dampness. Wear resistance is also important.
- The headgear should not distract from fishing or fall off during a fast run. It is inconvenient to hold it with your hands.
It is important to know the time:
- It is better to catch insects in May and June.
- However, there are some species that are found towards the end of summer.
- It is best to choose the afternoon hours, since most insects fly in the hottest time, after lunch.
Let's say moths hide when the sun goes down. If the insects are nocturnal, of course, they are caught after sunset. It is very easy to catch insects before a thunderstorm. The air is stuffy, and the stuffiness forces them to leave their shelters.
The better way to catch butterflies and other beetles, mosquitoes, moths and so on:
- As a rule, naturalists use special nets.
- A stick serves as support.
- This net is a strong wire circle with a diameter of about 30 cm . Attached to it is a cone-shaped bag made of lightweight fabric.
How to catch an insect:
- You should approach carefully.
- The shadow should be behind the insect, and not in front - otherwise it will slip away.
- The net should be cast quickly and accurately, surrounding the insect and preventing it from escaping.
- In addition to the mesh, there must be scissors made of strong iron wire.
Where are butterflies, beetles, moths, mosquitoes and other “bugs” with wings found:
- Often these are fields, the edge of a forest with flowers, meadows, etc.
- Moths can be caught as dusk approaches. Then there are swarms of small midges.
- You can attract butterflies by watering the branches of a tree with a mixture of honey, water and white beer or sugar water.
They should gather on one of the branches and this will make it easier to catch them. Watch a video of how Canadian scientists catch insects using convenient and interesting methods:
How to dry a butterfly with open wings. How to dry an insect
When dried, some insects greatly change their color and fade. You caught several bright red ladybugs, killed them, and laid them on mattresses. After a while we got ready to prick the beetles, opened the mattress - how they had changed! Where did the magnificent red color go?! The beetles acquired a dull, dirty-brown color. When dried, green grasshoppers turn brown, and dragonflies lose their blue stripes and spots. Is it possible to prevent color change and fading in dry insects? Unfortunately, there is still no method of pickling and drying insects that would preserve their original color completely and without changes. We are not even talking about the fact that in alcohol or formalin during long-term storage, insects generally lose any semblance of their natural color. However, there are some ways to preserve color close to natural, although they are rather imperfect. Leaf beetles and ladybugs change their color much less if they are marinated not with ether or chloroform, but with snuff. To prevent the disappearance of the bright pattern on the sides of the pectorals and abdomen of dragonflies, they are treated with acetone. As soon as the insect falls asleep in the stain, it is taken out, holding it by the wings folded together, and lowered into acetone so that the head does not submerge in the liquid. The dragonfly is kept in acetone for about 2 hours, after which it is transferred to ether for an hour. The insect removed from the ether is dried and placed on a mattress. Preserving the pattern on the chest of dragonflies is important not only to better preserve its appearance, but also to make it easier to identify later. Coloration is an important identifying feature for many of these insects. It is almost impossible to avoid browning of the color of locusts, grasshoppers and other orthoptera. The only thing that can be advised here is to dry them as quickly as possible.
Mummification of larvae and pupae
To prepare biological collections, it is often necessary to prepare a dry preparation of a particular animal. An example would be a collection dedicated to the development of an insect. All stages of its development should be located next to the dried and straightened adult insect. Larvae stored in bottles or test tubes with preservative liquid, of course, make less impression than dry objects. In some cases, larvae and pupae that do not have a dense chitinous covering cannot be dried as easily as adult insects, but mummies can be prepared from them, that is, mummified. Mummification takes a long time, so it is convenient to make mummies from a large number of animals at once. Usually only white larvae and pupae are mummified, since the colored ones lose their color. To work, you will need alcohol of 60, 75, 85, 96 and 100 degrees (for the preparation of alcohols of the required strength, see page 120), xylene, small tweezers, several salt shakers closed with glass. Instead of salt shakers, you can use any small vessels with a wide neck. Before killing a caterpillar or other larva intended for mummification, it should be thoroughly fed. Hungry caterpillars and other larvae may shrink during subsequent processing. The fed larva is pickled and scalded with boiling water, after which it is successively placed in alcohols of increasing strength: 60, 75 degrees, etc. The larva is kept in each alcohol for 1 to 2 days, depending on its size. The latter alcohol is absolute, that is, it contains no water at all. It needs to be changed once or twice. While in alcohol, the animal's tissues become dehydrated. The more thoroughly the dehydration is carried out, the better the next operation - degreasing. To degrease, the larva is placed in xylene, where it is kept for approximately the same time as in absolute alcohol. When removed from xylene, the larva becomes dry and hard. Now it can be stored together with dried adult insects.
When transferring an object from one liquid to another, it is picked up with tweezers. In this case, you should try to keep the larva in the air for as little time as possible, since this will allow the moisture in the air to penetrate into it. All vessels in which mummification is carried out must be tightly closed (Fig. 34). There should be enough liquid in each of them so that it completely covers the larva. Both alcohols and xylene should be replaced with fresh ones from time to time, as moisture, grease, and dirt accumulate in them. Sometimes the larvae, when passed through alcohol, shrink and lose their shape. Most often this is explained by the fact that the change in alcohol strength turned out to be too drastic for them. If for large and rough larvae it is enough to use only four alcohols - 60, 70, 96 and 100 degrees, then more delicate animals have to be passed through six - eight alcohols, for example: 45, 50, 55, 60, 70, 80, 96 and 100 degrees. In conclusion, it is necessary to say how to prepare absolute alcohol from commercial alcohol (96°). To extract water, dehydrated (white) copper sulfate is added to alcohol. Dehydration of vitriol is achieved by calcining it - the blue crystals lose color and turn into white powder. About a third of the volume of a jar with a ground stopper is filled with copper sulfate powder, after which alcohol is added to the jar. The vitriol greedily absorbs water and turns blue. There is practically no water left in alcohol. This alcohol is poured into another vessel containing white, dehydrated copper sulfate. Be sure to store absolute alcohol together with vitriol in a tightly sealed container, making sure that the vitriol under the alcohol remains white at all times.
Advice: Large and medium-sized ones with a more or less dense chitinous cover are stored dry.
The site has:
Preparation of wet preparations Methods of designing zoological collections Features of collecting aquatic animals Collecting arachnids for the collection Arranging butterflies for the collection
Drying an insect
, you can not only leave a small piece of summer and preserve good impressions of your vacation, but also create an original souvenir.
Let's talk about how to do it right. It's better to start by making a frame. To do this you will need wood or plywood, cardboard, glass, foam, paper and glue. First, 4 bars are cut out of wood or plywood - the basis for the frame. They should have the same width both on the front side and on the sides, and the length can be any. The ends of the bars must be cut at an angle of 45°. The smoother they are sawn off, the better the edges of the bars will meet when forming the future frame. It is necessary to make two cuts on the inside of the block along its entire length. One cut is made to insert glass into it. It should be slightly wider than the thickness of the glass so that the glass can be inserted easily and hold well. Another slot is needed to insert the back wall with the dried insect placed on it. The entire structure is secured using fasteners - thin metal plates pre-inserted into manufactured bars. To reach the back wall of the frame, these plates can be easily bent. The back wall is made of cardboard or thin plywood. In the center of the wall you need to make a rectangular cutout into which a foam plastic plate slightly larger than the cutout is attached, glued from the back of the back wall. Next, a beautiful fabric is glued to the back wall to give the frame a beautiful look. After this, we insert the glass into the frame, glue the bars with PVA glue and after the glue dries, we clean the frame with sandpaper. The frame is coated with furniture stain to give it a brown tint, and then several times with colorless varnish. Moreover, before applying each coat of varnish, you need to wait until the previous one has dried. When the varnish is dry, the frame is treated with fine-grained sandpaper. The coating is repeated 2 times, and the 3rd time the frame is simply varnished. The caught insect is killed in the stain. Strips of paper are placed at the bottom of a wide-necked jar, which are not needed when drying butterflies. The jar is closed with a lid, to which a cotton swab moistened with ether is attached to the bottom side, and left closed for several hours. Then the insects need to be straightened out immediately and pinned onto entomological pins before they dry out. For butterflies, flies, bees, wasps and dragonflies, pins are stuck vertically into the chest, and for beetles, grasshoppers and bedbugs into the right elytra. Next, wait for the insects to dry. The wings of the butterflies are carefully straightened, secured with strips of paper. To prevent the legs and antennae from breaking, they need to be positioned closer to the insect’s body. Next, we place the dried insect on the foam plastic of the back wall of the frame and glue a strip of paper with information underneath it. We insert the back wall with the insect into the finished frame and bend the fasteners. Fried Bamboo Worms
Where: Thailand, China, Latin America For Thais, a plate of fried bamboo worms is as traditional a way to start a meal as salad or soup is for Europeans. Their taste and texture are a little reminiscent of popcorn, although they do not have any special pronounced taste, but they are very nutritious. In fact, these are not worms at all, but larvae of grass moths from the grass moth family (Crambidae), living in bamboo. Traditionally they are harvested by cutting bamboo stalks, but more recently they have been grown commercially on farms and packaged in bags like chips. Bizarre Food products can, for example, be bought in England. In addition to Thailand, bamboo worms are eaten with pleasure in China and in the Amazon River basin.
Shish kebab from longhorned beetle larvae
Where: Eastern Indonesia Longhorned beetles, large and shiny beetles with long antennae, are distributed throughout the world, and there are many of them in Russia. In our country they are also called woodcutter beetles, in the English-speaking world - capricorn beetles. Longhorned beetle larvae, found in the roots of sago palms, are a very popular village food in Eastern Indonesia. For the sake of fatty and juicy larvae, Indonesians sometimes cut down small palm groves, and then, carefully stringing them onto twigs, roast the larvae over the fire. They have tender flesh, but a very dense skin that takes a long time to chew. The maggots taste like greasy bacon. The larvae have another use: villagers use them as ear brushes - a live larva is inserted into the ear, held by the tail with your fingers, and it quickly eats away the ear wax.
Cheese with cheese fly larvae
Where: Sardinia This cheese is proof that insects are eaten not only in Africa and Asia. Casu marzu is an important Sardinian specialty: cheese made from unpasteurized goat's milk with live larvae of the cheese fly Piophila casei. For most cheese lovers, casu marzu is not just mature cheese or blue cheese, but completely rotten cheese with worms. Strictly speaking, this is what it is: this is ordinary pecorino, from which the top layer is cut off so that the cheese fly can easily lay its eggs in it. The larvae that then appear begin to eat the cheese from the inside - the acid contained in their digestive system decomposes the fats in the cheese and gives it a specific softness. Some of the liquid even flows out - it is called lagrima, which means “tear”. In Sardinia, casu marzu is considered an aphrodisiac and is traditionally eaten along with worms. Moreover, casu marzu is considered safe to eat only while the larvae are alive. This is not easy to do: disturbed larvae, reaching a centimeter in length, can jump out of the cheese to a height of 15 cm - many cases have been described when they got into the eye of someone who tried the cheese. Therefore, lovers of casu marzu often eat this cheese with glasses or, spreading it on bread, cover the sandwich with their hand. However, removing larvae from cheese is not considered a crime. The easiest way is to put a piece of cheese or a sandwich in a paper bag and close it tightly: the suffocating larvae begin to jump out. When the shooting in the bag stops, the cheese can be eaten. Of course, casu marzu does not meet any hygienic standards of the European Union and was banned for a long time (it could only be bought on the black market at a price twice the price of regular pecorino). But in 2010, the casu marzu was recognized as a cultural property of Sardinia and allowed again.
Dried mopane caterpillars with onions
Where: South Africa Dried caterpillars of Gonimbrasia belina, a South African species of mopane moth, are an important source of protein for South Africans. Collecting these caterpillars in Africa is quite a serious business: in supermarkets and markets you can find both dried and hand-smoked caterpillars and pickled caterpillars rolled into tins. To cook a caterpillar, you first need to squeeze out its green intestines (usually the caterpillars are simply squeezed in your hand, less often they are cut lengthwise, like a pea pod), and then boiled in salted water and dried. Sun-dried or smoked caterpillars are very nutritious, weigh almost nothing and have a long shelf life, but do not have much flavor (they are most often compared to dried tofu or even dry wood). Therefore, they are usually fried until crunchy along with onions, added to stews, stewed in various sauces, or served with sadza corn porridge. However, very often mopane are eaten raw, whole or, as in Botswana, after tearing off the head. They taste like tea leaves. Caterpillars are collected by hand, usually done by women and children. And if they belong to anyone in the forest, then collecting caterpillars on neighboring trees is considered bad manners. In Zimbabwe, women even mark trees with their caterpillars or move young caterpillars closer to home, setting up unique plantations.
Boiled wasps
Where: Japan The older generation of Japanese still respects wasps and bees, prepared in a variety of ways. One such dish is hatinoko, which is bee larvae boiled with soy sauce and sugar: a translucent, sweetish caramel-like mass that goes well with rice. Wasps are also prepared in the same way - a dish with them is called jibatinoko. For older Japanese people, this dish reminds them of the post-war years and the rationing system, when wasps and bees were especially actively eaten in Japan. It is in steady demand in Tokyo restaurants, even if only as a nostalgic attraction. In general, hatinoko and jibatinoko are considered a rather rare specialty of Nagano Prefecture. Fried black wasps are a little more common and are sometimes served with beer in Japanese taverns. Another specialty, rice crackers with earthen wasps, is made in the village of Omachi. These are small cookies with adult wasps stuck to them - each one contains from 5 to 15 wasps. Japanese dishes made from wild wasps and bees are not cheap: it is impossible to put this business on stream; the preparation itself is quite labor-intensive. Wasp and bee hunters tie long colored threads to adult wasps and thus track their nests. However, you can also find canned bees in Japanese stores - this is usually how beekeeping farms sell their surplus.
Silkworm fried with ginger
Where: China, Korea, Japan, Thailand The city of Suzhou and its surroundings are famous not only for high-quality silk, but also for quite rare dishes made from silkworm pupae. As you know, silkworm caterpillars wrap themselves in a thin but strong silk thread. In the cocoon they grow wings, antennae and legs. Before this happens, Suzhou residents boil them, remove the cocoon, and then quickly fry them in a wok - most often with ginger, garlic and onions. However, tender larvae, crispy on the outside and soft on the inside, go well with almost any vegetables and spices. When cooked correctly, they taste like crab or shrimp meat. Silkworm larvae are no less popular in Korea. Trays of beondegi, boiled grubs with spices or steamed grubs, are found throughout the country. And stores sell canned silkworms, which must be boiled before use. They are also loved in Japan, especially in Nagato, and Japanese astrophysicist Masamichi Yamashita even suggests including silkworms in the diet of future Mars colonists.
Fried ants
Where: Mexico, Colombia, Australia, South Africa Ants are the most popular edible insects on Earth after grasshoppers. In Colombia, fried ants are even sold in movie theaters instead of popcorn. The ones most loved in Colombia are female ants with eggs. They are caught on rainy days, when water floods the anthills and the females climb out. In the simplest rustic version, they are prepared by wrapping them in leaves and holding them over the fire for a while. This is a crunchy, sweetish snack with a distinct nutty flavor. But the most delicious ants, the so-called “honey” ants, are found in Australia. They feed on sweet nectar, transporting it in swollen abdomen (in Russian-language literature they are called “ant barrels”). These transparent bubbles are considered a sweet delicacy among the Australian Aborigines. In addition, two genera of honey ants are found in South Africa and the semi-deserts of North America.
Deep fried water bugs
Where: Thailand, Vietnam, Philippines Large water bugs - insects from the Belostomatidae family - live all over the world, most of them in America, Canada and Southeast Asia. But while for Americans these are just large insects whose bites sometimes last for two weeks, in Asia they happily eat water bugs. The Asian variety, Lethocerus indicus, is the largest in the family at 12cm in length, so the Thais simply deep-fry them and serve them with plum sauce. The meat of water bugs tastes like shrimp. At the same time, in Thailand they are eaten whole, in the Philippines the legs and wings are torn off (and in this form they are served with strong drinks as a snack), and in Vietnam they are made into a very fragrant extract, which is added to soups and sauces. One drop is enough for a bowl of soup.
Grasshoppers with avocado
Where: Mexico John the Baptist, as is known, ate grasshoppers: the locusts, which he ate with wild honey, are locusts, a close relative of the grasshopper. It could be understood by Mexicans, for whom grasshoppers are practically a national food. Grasshoppers are eaten everywhere in Mexico: boiled, raw, sun-dried, fried, soaked in lime juice. The most popular dish is grasshopper guacamole: the insects are quickly fried, causing them to instantly change color from green to reddish, mixed with avocado and spread on a corn tortilla. Like any small fried insect, fried grasshopper does not have a prominent flavor and usually tastes like the oil and spices in which it was fried. The grasshoppers sold by street vendors in Southeast Asia are simply overcooked chitinous shells. In general, grasshoppers are eaten wherever insects are eaten. Grasshoppers boiled in salt water and dried in the sun are eaten in the Middle East, in China they are skewered like kebabs, and in Uganda and nearby regions they are added to soups. It is curious that in Uganda, until recently, women were not allowed to eat grasshoppers - it was believed that then they would give birth to children with deformed heads, like grasshoppers.
Dragonflies in coconut milk
Where: Bali
Dragonflies in coconut milk
Where: Bali Dragonflies can reach speeds of up to 60 km/h, so edible dragonflies are real fast food. They are caught and eaten in Bali: it is not easy to catch a dragonfly, for this they use sticks smeared with sticky tree sap. The main difficulty is to touch the dragonfly with this stick in a smooth and at the same time fast movement. Caught large dragonflies, whose wings are first torn off, are either quickly grilled or boiled in coconut milk with ginger and garlic. Dragonflies are also made into a kind of candy by frying them in coconut oil and sprinkling them with sugar.
Tarantulas baked on coals
Where: Cambodia Black-fried tarantulas, which look like varnished, charred firebrands, are a common street food in Cambodia. A successful tarantula catcher can catch up to two hundred individuals per day. They sell very quickly. Cambodian tarantulas are fried in a wok with salt and garlic - their meat tastes like a cross between chicken and fish. Large tarantulas, reaching 28 cm in diameter, are eaten in Venezuela simply by roasting them on coals. A slightly more elegant method of preparing tarantulas is used in Japan: they first tear off the spider's abdomen, then singe the hairs and quickly fry them in tempura. However, it is believed that the most delicious spiders are not tarantulas, but spiders from the Nephilidae family, which are eaten in New Guinea and Laos. These spiders taste like peanut butter when fried.
So summer is over. Leaves are falling. Let's better talk about how to take at least a little bit of summer with you. You can do this in different ways, of course, but the surest way is to leave good and unforgettable impressions of your summer vacation.
But since I am not a professor of psychology and I don’t know what memory will be pleasant for you, I will tell you about simpler and more material things that will leave you with that very particle of summer. In this article we will talk about how to dry an insect, and then decorate such an interesting souvenir.
Let's get started. You, of course, can do whatever is most convenient for you, but I will start by making a frame. Here's what we need for this: - plywood or wood - glue - glass - cardboard - polystyrene foam - paper
It is necessary to cut 4 bars from plywood or wood, which will later serve as the basis for the frame. All 4 bars should be the same width, both on the front and sides, the length may vary depending on what kind of frame you need. Trim the ends of the bars at a 45° angle as shown in (A). The sawing places are marked in red; the smoother you saw off, the better the edges of your bars will meet, forming the future frame. If you sawed off correctly, the gaps in the convergence of the bars will be almost invisible.
Let us now turn to figure (B). It shows a block in which you need to make cuts. The cuts are made on the inside of the bar, the letters “L”, “B” and “O” indicate the Front side, Side side and Back side (back), respectively. A longer slot is necessary for inserting glass into it, so it should be slightly larger than the thickness of the glass so that the glass can be inserted easily and held firmly. A short slot is needed to insert the back wall, on which our dried insect will be placed. The letter "K" in figures (A) and (B) indicates fastenings. The fasteners are thin metal plates that can be easily bent at any time and the back wall of the frame can be removed. The plates are inserted into the bars we made. The main part of the frame is ready.
Let's start making the back wall.
The back wall should fit completely into the slot we made earlier. As you can see from picture (C), there is a slot in the center of the wall into which the foam “P” is attached. The foam plate should be slightly larger than the slot. It must be glued from the back of the back wall, i.e. the side that will be closer to the wall when we hang the frame. The back wall is made of thin plywood or cardboard, after which some beautiful “T” fabric is glued to it, this will give the frame a more presentable look.
Insert the glass into the frame and glue 4 bars with PVA glue, let the glue dry. The frame is almost ready. After the glue has dried, clean the frame again with sandpaper. Cover the frame with furniture stain, this will give it a brown tint. Next, you need to coat the frame several times with clear varnish; between each coat of varnish, wait until the varnish dries properly. After the varnish has dried, go over the frame with fine-grained sandpaper. Repeat coating 2 times. For the 3rd time, simply coat the frame with varnish and let it dry. The frame is ready.
Well, now let's get down to the most important thing.
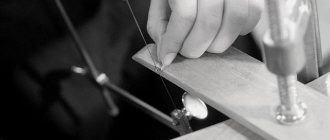
If you have already caught an insect, then that’s just great. The caught insect is killed in the stain. We take a jar with a wide neck, put strips of paper on the bottom (if you are going to dry butterflies, then strips of paper are not needed), close the jar with a lid, to the underside of which attach a cotton swab moistened with ether, leave the jar closed for several hours. After this, the insects are immediately straightened and pricked for the first day, before they dry out, otherwise some limbs will break. Insects are pinned onto entomological pins. Pins are stuck vertically into the chest of butterflies, flies, dragonflies, bees, wasps, or into the right elytra of beetles, grasshoppers, and small bugs. Wait until the insects dry out. The wings of butterflies are carefully spread on the so-called “spreaders”. First, one wing is secured with strips of paper, then the other. The legs and antennae are placed as close to the body of the insect as possible so that they do not break.
Now we place the dried insect on the foam back wall of the frame. We glue a strip of paper with information about it to the plate under the insect. We insert the back wall, but with the insect, into the frame we made. We bend the fasteners so that the back wall is firmly held in the frame. Our souvenir is ready.
A home collection of insects will increase interest in you when any guests arrive. Such products not only decorate your home, but are also a unique gift for loved ones.
Learn to make things with your own hands.
In recent years, many people have been purchasing exotic animals as pets, which need to be fed accordingly. Bukahi brand
. Dried and fresh insects as food and treats may be of interest to owners of animals such as meerkats, hedgehogs, possums, turtles, small primates, fish, birds, rats, hamsters, terrarium animals and other insectivores. Before buying insects for food or treats, find out whether your pet can be given such food. Insect food is rich in protein and it is almost impossible to replace it. Made from crickets, grasshoppers, grasshoppers, mealworms, silkworms and other insects. Canned food keeps insects in their original form, fresh and tasty. When preserving, a special temperature regime is used; this technique allows you to soften all the hard parts of insects. All the nutritional qualities of insects are preserved. Canned insects are a wonderful delicacy, rich in microelements, high nutritional value and vitamins. And the animals themselves love them very much; for them, a canned beetle or cockroach is the best vitamin treat. Dried insects differ from canned ones just as fresh apples differ from dried ones. All insects are carefully selected and dried at the optimal temperature, which allows the insect to be thoroughly dried and all vitamins preserved. In nature, animals eat insect corpses, often already dried, so this food-delicacy is natural and is calmly accepted by animals; they will happily crunch on a dry bug. Insects, both canned and dried, have high nutritional and taste value and will be an excellent and indispensable food or treat for all insectivorous animals, birds and reptiles. Animals happily eat both dried and canned insects, even if you have always fed them alive. At home, the hunter's instinct, which you try to preserve by feeding the animal with live insects, atrophies. Therefore, all efforts to preserve it are ultimately pointless. Transportation and storage of canned and dried insects does not cause such difficulties as frozen and live ones. A refrigerator is required for transporting and storing frozen insects, but live ones must be carefully monitored so that they do not run away and be fed. Storing dry and canned insects does not require special conditions, reliable jars are difficult to break, they have a long shelf life compared to fresh ones and are quite difficult to spoil, and dry insects are carefully packaged and with careful handling the risk of causing damage to them is minimal. The benefits of dry and canned insects are obvious. The Bukahi brand is a high-quality natural food for exotic and insectivorous animals, birds and reptiles.
How to kill insects for an entomological collection?
Insects in the entomological collection
This should be done quickly and humanely. You shouldn’t let a living creature suffer for a long time. This develops cruelty in children. Little butterflies just get squeezed. Larger insects can be doused with hot water. Or put sulfuric ether at the bottom of the box.
About punctures:
- The puncture with a pin is carried out in the middle of the chest.
- You need to carefully pass the pin through the entire body.
- The insect should be spread out on a damp board. It should dry.
- Each board should be equipped with a piece of paper glued with gum arabic. This makes it easier to determine what species or type the insects belong to.
- They should be stored in boxes with cork or peat at the bottom.
- It is best to prick butterflies from top to bottom.
- Before the box is closed, a bottle of gasoline is dropped into it. It protects against moths and bugs.
- If the butterfly has wrinkled over time, it should be placed under a glass cover and then straightened.
Worth knowing: If mold appears on a bug, then lubricate this area with a brush with alcohol or ether.
Here's more information on how to kill insects for an entomological collection:
- Collectors should remember that killing insects is, in this case, a necessary necessity, and not a way of obtaining pleasure.
- As a rule, specially made stains are used. This is the most painless way to take the life of an insect.
- They can be with sulfuric or acetic ether, or chloroform.
You can make stains using tall glasses made of thick glass or jars. It’s great if you can seal the stain with a cork stopper.
Tip: Place some tissue paper at the bottom of such a glass or jar. This is especially necessary if you want to dry several insects at the same time. This method helps to prevent insects from rubbing and forming a ball. Butterfly stain does not require paper.
It's also worth remembering:
- There should be several stains. Large beetles should not be placed in the same container as flies, etc.
- In order to kill insects, you need to wet the cotton wool with the above mentioned agents. Vapors from various ethers and alcohols can kill living organisms.
- Acetic ester kills more slowly. However, insects killed in this way are softer.
- If there is no ether or chloroform, you can use gasoline.
Precautionary measures: Ether and gasoline are flammable substances. Therefore, when using them to treat insects, be careful.
HIGH TEMPERATURE to kill insects. This method is suitable if you do not have poisons or do not want to use them. To do this, do the following:
- Take a tin or zinc jar.
- Close the lid tightly.
- Place in boiling water.
Don't do this to insects that have developed jaws. They can ruin other copies.
Killing can be carried out in wine alcohol:
- Dip the insects into a container with this substance and you’re done.
- But it is important to remember that this is suitable for those who do not have long, bright hairs or scales.
- That is, you can only kill dark-colored beetles this way. The alcohol strength must be at least 60°.
As you can see, each type of beetles, butterflies, moths, mosquitoes and other insects has its own method of killing.
How to painlessly euthanize an insect
The collection of butterflies most often begins with representatives of the most common families. This includes whitefishes, nymphalids, marigolds, bluebirds, swallowtails and others. Well, even by collecting just a few butterflies from each family, you can already create an impressive collection that will do honor to any beginning lepidopterophilist.
But the collector loves wildlife and will try not to torture the caught or hatched insect, ensuring it has the easiest, fastest and most painless death possible. How to do this?
For this you will need ether. It can be purchased at many veterinary clinics and pet stores. But, alas, it is not always possible to buy ether, especially in small towns or villages, where it is easiest to get interesting exhibits. Well, a butterfly collector can also use ammonia or ammonia, which is sold in most regular pharmacies, and the solution is not at all expensive. And using it is as simple as possible - any teenage beginner can easily cope with the task.
It is enough to dip a small piece of slightly compressed cotton wool in ether or ammonia and put it in the jar where the butterfly is, then close it with a lid. After some time (it depends on the amount of liquid absorbed by the cotton wool and the volume of the container), the insect dies painlessly.
How to dry insects for collection: general recommendations
Collection of insects
An insect should be dried immediately after it is caught. If it is necessary to dry the beetle, it is glued to the foam with glue. You definitely need to straighten his paws and secure them with pins.
- After the insect has dried, you need to carefully remove it from the foam and then glue it onto a cardboard block.
- It is important to protect the collection from pests.
Insects are attached to the foam with pins if they are dry. There should be a piece of paper with the name next to it. The foam is placed in a box and put away in a warm and dry place. As a rule, drying lasts about a week. But everything can be ready earlier. The beetles will take up to a month to dry. The period depends on the size of the insect and the region where it was caught.
How to dry butterflies for a collection?
Butterfly collection
So, how to properly dry butterflies for a collection? Here are some important nuances:
- The main thing is to spread your wings. This needs to be done correctly.
- If the insects have just been caught, you can immediately begin the process.
- And if the butterflies are dried, then they need to be soaked.
- This can be done in a glass desiccator or in a saucepan. Sand is poured there (preferably it should be fine, river sand, sifted through a sieve, and kept in boiling water).
- Drain the water and use the sand to arrange the bags of butterflies.
- Instead, you can use cotton wool or damp foam rubber. The butterfly is soaked in water vapor.
- Cover the pan tightly with a lid.
Tip: Add phenol to the water. It will save you from rot and mold, but this substance is considered very toxic.
Small butterflies can be straightened out the very next day. Large ones take a little longer. You can add water to a syringe and inject it into the insect's chest, where the wings begin. This will speed up the process. It's also worth knowing the following:
- If the butterflies are rare and delicate, they can be put on a pin right away.
- If the insect's head is turned to one side, it should be adjusted with tweezers so that it takes a normal position.
- Insects are spread out by spreading.
- It is necessary to position the insect so that its body is in the groove and its wings are located on the planks. The basis for straightening is a wooden plate.
- On some products, the distance between the boards is adjusted using a screw.
The process of laying the butterfly out:
- Insert a pin with a butterfly into the groove, perpendicular to the longitudinal and transverse axes.
- The bases of the wings should be located at the upper edges.
- Stick it to the right of the abdomen - otherwise the butterfly may start to turn.
- Place pieces of cellophane or tracing paper on the wings, which are held on boards. They should cover the wings almost completely.
- Use a long tailor's pin. Use it to carefully move the wing until the top edge is perpendicular to the longitudinal axis.
- Then move the rear fender. It should go under the front one.
- The other pair of wings moves similarly. By the way, don't pierce the wings. This will ruin their appearance.
Tip: Pin along the edges. The wings should be pressed against the planks and not be displaced. Place cotton wool under the belly to prevent it from drooping, and place the mustache along the front edge.
The butterflies take several days to dry. And then their body retains its properties. By the way, insects that have just been caught take longer to dry than those that have been soaked.
When the butterfly has already been removed from straightening:
- It needs to be labeled.
- Indicate on it the name of the region where the butterfly was caught, the date, and the name of the catcher.
This design of the collection allows you to preserve the insect in a beautiful form for a long time, and the label will not allow you to forget all the necessary information.
How to keep butterflies in your collection
Desiccator for soaking butterflies
Everyone understands that wrinkled insects with folded wings and flattened in a bag are just a “blank” for a collection. In order for the butterflies to appear in all their glory, they must be straightened. This is not difficult, but it requires concentration, patience, sensitive hands and some equipment.
The main thing is to spread the butterfly's wings . Freshly caught and not yet dried butterflies can be straightened out immediately, while dried ones are pre-soaked. This is done in a glass desiccator (a special vessel with a lid) or simply in a saucepan. Fine river sand, sifted through a thick sieve and kept in boiling water, is poured into the container to kill mold spores.
Immediately after soaking, the butterfly is pinned onto an entomological pin, which is inserted strictly vertically into the middle of the chest. About a third of the pin should protrude above a medium-sized butterfly. If this part is smaller, the butterfly can be easily damaged by holding a pin. Entomological steel pins are 36–38 mm long, but their thickness (diameter) varies and is designated by number. For small and medium-sized butterflies, pins with numbers O, 1, 2, 3 are usually used, and thicker ones (numbers 4, 5, 6) are intended for very large butterflies.
The water is drained, and bags of butterflies are placed on the wet sand. Sand can be replaced with damp foam rubber or cotton wool. In all cases, the butterfly is soaked in water vapor at room temperature, and its contact with the water itself is not allowed. Cover the desiccator or pan tightly with a lid. First, you can add several crystals of carbolic acid - phenol, which protects against rot and mold. It must be remembered that phenol is toxic, and its vapors and solutions irritate the mucous membranes of the respiratory tract, eyes and skin. Therefore, you must work with it carefully, observing all safety rules.
Small butterflies can be straightened out the very next day, while large ones are kept in wet sand longer. In very large specimens this process can be accelerated by using a syringe to inject a few drops of water into the chest, at the base of the wings. Sometimes very delicate or rare butterflies are pinned with entomological pins as soon as they are caught, and in this form they are placed in boxes with thick soft bedding, and then, when soaked, in damp sand. It happens that after being in a bag or on a cotton mattress, a butterfly’s head turns to one side. If it remains like this after soaking, you just need to turn it with tweezers to its normal position, otherwise it will not be possible to straighten the antennae correctly.
Now you should begin to straighten the butterfly on a straightening board, consisting of two smoothly planed boards of soft wood (linden or poplar), between which there is a groove the width of the butterfly’s body. The planks are mounted on a wooden plate, and the groove is lined with dry peat or other soft material. Universal straightenings are convenient, in which the distance between the boards can be changed and fixed with a screw.
The width of the straightening boards should be such that the straightened wings fit entirely on them. The usual width of the groove for daytime butterflies in the middle zone is 3-9 mm, for nocturnal butterflies - up to 12 mm, and for tropical ones - even more. Instead of wooden ones, you can make your own foam spreaders. You just need to make sure that the surface on which the butterflies spread their wings is smooth.
1. A pin with a butterfly is inserted into the groove perpendicular to the longitudinal and transverse axes of straightening. In this case, the bases of the wings should be at the level of the upper inner edges of the planks. You should insert a pin to the right of the belly to prevent the butterfly from turning. 2. Pieces of tracing paper or cellophane are placed on the wings and pinned to the straightening boards. Tracing paper or cellophane covers the entire surface of the wings, except for a narrow, about 2-5 mm wide, strip at their base. 3. Using the point of a long tailor’s pin or dissecting needle, very carefully move the front wing until its rear edge is perpendicular to the longitudinal axis of straightening.
4. Then the rear wing is moved forward, while its leading edge should go under the front. The other pair of wings is spread in the same way. During this process, the wings should never be pierced; they are moved only by touching the thick veins with the tip of the needle. 5. Tracing paper or cellophane is pinned with tailor's pins to be spread along the edges of the wings. Now the wings are pressed against the straightening boards and cannot move. To prevent the butterfly's abdomen from drooping, a piece of cotton wool is placed under it, and the whiskers are laid along the front edge of the front wings. 6. After a few days, the butterflies in the spread dry out, and when the tracing paper or cellophane is removed, their wings retain their position. Freshly caught butterflies dry much more slowly than soaked ones.
The butterfly, removed from straightening, must be immediately provided with a label. Without an accurate label, the most remarkable butterfly has no scientific value. On a rectangular piece of thick paper measuring 8x18 mm or larger, write legibly: 1. The name of the state, province (region), mountain system, settlement, altitude above sea level where the butterfly was caught. 2. The date it was caught and the name of the catcher. The label is pinned onto a pin with a straightened butterfly, which can now be placed in a collection box. The collection consists of labeled, straightened butterflies, placed in boxes or wooden boxes, the bottom of which is covered with sheet polystyrene foam, pressed peat or other soft material, into which pins with butterflies are stuck. The top of boxes and crates is usually glazed.
How to properly dry a dragonfly with open wings at home?
Using the example of a butterfly, also dry a dragonfly.
A dragonfly is as fragile as a butterfly. Her wings can be broken with one wrong movement of the hand. If you decide to dry it, then you need to do it correctly. Many people simply place the dragonfly on a piece of cotton wool. This method is not successful, since insects dried by this method are not stored for a long time. How to properly dry a dragonfly with open wings at home? Here are a few nuances:
- The dragonfly should be pinned. This is the most optimal storage method.
- Sometimes before drying a dragonfly, it needs to be steamed. This is required when it has lain in its original form for a long time.
- First, place it in a humid chamber. This can be either a crystallizer, a glass bath, or just a deep plate.
- Washed sand is placed at the bottom of this container. An insect is placed on top.
- It is necessary that the vessel closes well.
Worth knowing: It is prohibited to prick insects when they are dry - they may break. The first thing a dragonfly needs to do is spread its wings.
This can be done using the same method as spreading the wings of a butterfly. Read the text above.
- Place the dragonfly on a special groove, holding it with your fingers.
- With your right hand, stick a pin into it.
- Then take the insect with two fingers and push it to the maximum depth.
A pin is inserted perpendicular to the upper surface of the insect, towards the surface of the outstretched wings. You need to have enough room for your fingertips between the head of the pin and the insect. To do this, do the following:
- Take the pin by the head without hitting the insect.
- Be sure to straighten the already pinned dragonfly.
- Bend your legs closer to your body. They shouldn't hang around. However, they must maintain a natural position.
- Pin the legs with pins until the insect dries.
- The spread wings should be laid horizontally.
Remember: When straightening the dragonfly, take it with tweezers, not with your hands. The needle is carefully inserted into the vein so as not to damage the wings or tear them.
To prevent the bright pattern on the sides of the thoracic segments and abdomen of the dragonfly from disappearing, you need to treat it with acetone. When the dragonfly falls asleep in the stain, you need to take it out, holding it by the wings that are folded together, and then dip it in acetone. But not with my head. You should keep it in this state for a couple of hours, and then keep it on the air for an hour.
After this, the dragonfly is dried and placed on a mattress. Maintaining correct coloration is important for species identification. Coloring is an important indicator of a particular insect.
How to dry a butterfly at home. Dried insects and canned insects
In recent years, many people have been purchasing exotic animals as pets, which need to be fed accordingly. Bukahi brand
. Dried and fresh insects as food and treats may be of interest to owners of animals such as meerkats, hedgehogs, possums, turtles, small primates, fish, birds, rats, hamsters, terrarium animals and other insectivores. Before buying insects for food or treats, find out whether your pet can be given such food. Insect food is rich in protein and it is almost impossible to replace it. Made from crickets, grasshoppers, grasshoppers, mealworms, silkworms and other insects. Canned food keeps insects in their original form, fresh and tasty. When preserving, a special temperature regime is used; this technique allows you to soften all the hard parts of insects. All the nutritional qualities of insects are preserved. Canned insects are a wonderful delicacy, rich in microelements, high nutritional value and vitamins. And the animals themselves love them very much; for them, a canned beetle or cockroach is the best vitamin treat. Dried insects differ from canned ones just as fresh apples differ from dried ones. All insects are carefully selected and dried at the optimal temperature, which allows the insect to be thoroughly dried and all vitamins preserved. In nature, animals eat insect corpses, often already dried, so this food-delicacy is natural and is calmly accepted by animals; they will happily crunch on a dry bug. Insects, both canned and dried, have high nutritional and taste value and will be an excellent and indispensable food or treat for all insectivorous animals, birds and reptiles. Animals happily eat both dried and canned insects, even if you have always fed them alive. At home, the hunter's instinct, which you try to preserve by feeding the animal with live insects, atrophies. Therefore, all efforts to preserve it are ultimately pointless. Transportation and storage of canned and dried insects does not cause such difficulties as frozen and live ones. A refrigerator is required for transporting and storing frozen insects, but live ones must be carefully monitored so that they do not run away and be fed. Storing dry and canned insects does not require special conditions, reliable jars are difficult to break, they have a long shelf life compared to fresh ones and are quite difficult to spoil, and dry insects are carefully packaged and with careful handling the risk of causing damage to them is minimal. The benefits of dry and canned insects are obvious. The Bukahi brand is a high-quality natural food for exotic and insectivorous animals, birds and reptiles.
Every season has something special that inspires new games and creative ideas. So cold and slush are not a reason to give up fun autumn activities. To get started, you can use these interesting ideas; they will definitely delight your child and the whole family. So here's what to do in November. 1. Make a toy from natural materials. Together with your child, collect pine cones, twigs, berries, seeds, dry leaves and feathers in the nearest park. Create a sculpture or hanging toy from these items...
DOCTOR SUMMER
Summer can safely be called the favorite season of most Russians. But these long-awaited months usually fly by very quickly (and in some regions - simply rapidly), so you want to make the most of them for the benefit of yourself and your body. And it's quite simple! BREATHE? EASILY! If you happen to catch a runny nose in the summer (due to a cold or short-term hypothermia under the influence of air conditioners), then do not rush to “quarantine” at home alone with a bottle of vasoconstrictor drops. And in general, you don’t have to stay at home: by avoiding crowded places, you can…
Dry insects can be stored in cotton wool indefinitely, but usually dry insects, sooner or later, are dissected - pinned. It is this storage method that is normal for dry insects.
You can dissect both freshly killed insects and those that have lain dry for a long time. A fresh insect is quite pliable, and therefore its impaling and straightening does not require any preliminary operations: you just need to wait until rigor mortis passes and the insect’s joints acquire (temporarily) sufficient pliability and mobility. Dry insects must first be softened - steamed.
To steam, dry insects are placed in a humid chamber. Making such a chamber is not difficult: it can be used in any room whose air is saturated with water vapor. A crystallizer, a glass bath, even just a deep plate are quite suitable for this (Fig. 15).
Rice. 15. Steaming insects:
on the left - under a glass cover; on the right - in the desiccator
Clean, well-washed and calcined river sand is placed at the bottom of the vessel (the thickness of its layer is 1-3 cm, depending on the capacity of the vessel). The vessel must close well. The sand is abundantly moistened with water (preferably boiled), then a layer of cotton wool with dry insects (or individual insects) is placed on it, and the vessel is closed with a lid or glass. To avoid mold, it is useful to place several crystals of carbolic acid or thymol in a vessel on sand. After a day, the insects become quite soft (small insects soften faster, large insects soften more slowly). If insects are kept in a chamber, their joints become less obedient and straightening takes more time; if they stay in the chamber for a long time, insects may become moldy, and more delicate ones may fall apart into separate parts. Therefore, insects should be kept in the chamber only for the time required for softening. The most convenient degree of softening of an insect (except for butterflies) for the preparator is such that it acquires so-called waxy mobility: the limbs easily maintain the position given to them by the preparator. It is possible to set the time for this degree of softening only for almost every individual collection. Insects killed by “staling” poisons (gasoline, for example) require longer steaming.
In museums, when steaming a large number of insects at once, simple glass desiccators are very convenient. Boiled water is poured into the lower compartment (add a little carbolic acid), the large upper compartment is used for laying out insects.
When softening in a humid chamber, a dry insect goes through a number of stages, degrees of softening. The stage of waxy mobility is preceded by a condition in which the joints are mobile, but the limbs are not held in their assigned position; after the stage of waxy mobility has passed, the pliability of the joints increases, but they again become less and less obedient. When the steamed insect dries, all stages are repeated, but in the reverse order, and the duration of each of them is greatly reduced (the steamed insect dries out much faster than the dry one softens). Obviously, it is possible to bring an insect to the stage of waxy mobility not only in a chamber: a heavily steamed insect, drying out, will inevitably pass through the stage we need, and the preparator’s job is only to catch it.
You cannot prick dry insects: not only will they be broken, but straightening them will also be impossible. If it is necessary to re-dissect an insect that has already been pinned and straightened, it is softened in the same way as one taken from cotton wool. If you need to soften just a few small insects, then any wide-necked bottle (material jar) can be used as a wet chamber: water is poured into the bottom, and the insects are stuck into the underside of the cork. When steaming pinned insects in ordinary damp chambers, pins are stuck either into sand or into a cork plate.
A freshly killed insect, steamed or removed from alcohol, is pinned (or glued). Insect pins are so-called entomological pins. Their length is 38-40 mm, and the thickness is different: there is a series of numbers, from 000 to 5 (there are thicker and longer ones, but for our insects they are not needed). The best pins are steel, varnished, with a brass head. “White” pins are of little use for pricking, as they easily oxidize, produce green marks and spoil the insect (however, they are more convenient than steel ones in extremely damp areas, since there steel pins rust more easily, and a rusty pin is both less convenient and much more dangerous for the safety of the insect than the green “white”). In the absence of special pins, the insect can be pinned on a simple pin, or on a needle, or on a piece of thin wire, but such a pin is a damage to the material, and you can resort to it only in extreme cases.
The thickness of the pin depends on the size of the insect being pinned. Pins 000 are used for pinning only very small midges, mosquitoes, small moths, i.e. relatively rare. The most common pin numbers for our insects are 00, 0 and 1. Thicker pins are rarely needed: only for very large insects. It should be remembered that a thin pin can always be replaced with a thicker one if necessary, but replacing a thick one with a thinner one is not only more difficult, but is also accompanied by a certain damage to the insect, although from a purely preparatory and collector’s point of view: the hole from a thick pin is large for a thinner one, new a puncture is obvious damage to the insect; fixing a pin in a hole from a previous pin that is too large for it is possible with glue, but this is also damage to the object. A thin pin is more difficult to stick into the bottom of a drawer without the habit, but this is not an argument in favor of thicker pins. You need to take it as a rule: the thinner the pin, the better.
There are two ways to pin an insect. The insect is placed in a groove specially made for this purpose in a cork plate (or in a plate made of very soft wood, dense peat, etc.), hold it with the fingers of the left hand, and stick a pin into it with the right hand, then take the insect with the index and thumb left hand and, holding it in the air, bring the pin to the desired depth with the right hand. Another way: the insect is immediately taken with the left hand (thumb and forefinger), and a pin is stuck into it with the right hand.
The pin is inserted in a strictly defined way. It should be perpendicular to the upper surface of the insect (with unstretched wings, with spread wings - to the surface of the wings); This position of the pin is easily achieved with practice. The insect rises on a pin to a known height: it should be at a level no lower than 3/4 of the length of the pin and no higher than 4/5 of it, counting from the sharp end of the pin. It is necessary that between the head of the pin and the insect there is enough space for the ends of the fingers (so that you can grab the pin by the head without touching the insect), and at the same time, that there is enough part of the pin below the insect for placing labels on it and for sticking into bottom of the box. In no way should you lift the insect on the pin up to the head in order to hide the part of the pin sticking out above the insect: there is no beauty in this, but there is a lot of inconvenience.
Rice. 16. Impaled insects of different orders:
A - orthoptera with wings spread on one side;
B - the same, with folded wings;
C and D - bedbugs with varying degrees of scutellum development;
D - Hymenoptera (diptera are also pinned).
The hole shows where the pin was pierced
Insects of different orders are pinned slightly differently (Fig. 16). The beetles are pinned into the right elytra so that the pin comes out at the bottom between the second and third pairs of legs. You need to make sure that when piercing the beetle's chest, the pin does not land on the basin of the leg: then it will tear it out and the leg will fall off. The bugs are pinned into the shield between the elytra, but not in the middle of the shield, but slightly to the right of the middle: it is necessary that on the underside of the body the pin does not fall into the groove for inserting the proboscis. Orthoptera insects are pricked with their wings folded, just like beetles; with the wings spread, in the middle of the back of the back (chest). The remaining insects are pricked in the middle of the back (chest).
The impaled insect is straightened, and in some cases the straightening can be of two sharply different kinds (not counting certain features of the straightening of the specimens intended for display).
The arrangement of insects intended for stock collections has a specific purpose: to protect the insect from damage, to save space occupied by the insect, and at the same time to dissect the insect so that all its parts are available for examination. Butterflies are arranged in the same way both for display and for collections; the same applies to dragonflies and mayflies.
As a rule, for storage in funds (scientific collections), the legs of an insect are bent closer to the body so that they do not stick out, and the antennae are directed back (in beetles), parallel to the body (Fig. 17), or, with wings spread, to the sides , along the anterior edge of the wing (elytra). For exposure, the legs and antennae are often straightened, moving them to the sides. In such cases, symmetry should be maintained and the legs should be given a more or less natural position. To hold the legs and antennae in their given position, they are pricked with pins (until the insect dries).
Rice. 17. Pinned and straightened, with legs bent, beetle
(to the right - with labels indicating the location and name of the beetle)
In Orthoptera (jumpers), for the purpose of determination we have to consider the wings. For stock collections, therefore, wings on one side are often spread out to save space. For exposure you need to either not spread the wings at all or spread both pairs.
In Diptera and Hymenoptera, the wings are usually not straightened (not moved far to the sides), but only slightly trimmed so that they lie (along the body or slightly to the sides) symmetrically. Specimens with both outstretched and folded wings are desirable for display.
The most difficult thing is to straighten the butterflies.
A spreader is used to straighten the butterflies. In Fig. 18 shows its structure. Take two identical, well-planed smooth planks of soft wood, each 25-30 cm long and 5-8 cm wide. These planks are glued to a stand made of blocks. A gap of 7-10 mm wide is left between the plates: this is a groove for the breast and abdomen of the butterfly. The bottom of the groove is lined with peat or cork (for sticking a pin). The abdomen of butterflies can be of different thicknesses, and therefore you need to have several alignments with grooves of different widths. The width of each straightening board should be such that the wings of a butterfly fit on the board. Therefore, for very small butterflies you can make small straightenings.
Rice. 18. Straightening for butterflies:
A - general view; B - top view;
B - cross-section of the straightening, the groove structure is visible;
G - arrangement of a stand for straightening boards;
D - butterflies on straightening
The steamed (or recently killed) butterfly is pricked. The pinned butterfly is placed on a straightening so that the abdomen and chest lie in the groove, and the bases of the wings are exactly at the level of the planks. If the abdomen is curved and does not fit into the groove, then it needs to be pinned with pins: they will hold it in the groove. You can't stick pins into the belly.
Then take two narrow strips of thick paper (no wider than 0.5 cm) and pin them at the inner edge of the board, slightly above the front edge of the front wings. With your left hand, pull the end of the paper strip so that it lightly presses the wings of the butterfly. With the right hand, using a needle, carefully move the front wing forward (Fig. 19 a). When the wing lies correctly (that is, its rear edge is perpendicular to the body), the paper strip is pulled tighter so that it holds the wing in its position. Then move the rear wing forward with the needle. The wings of a properly spread butterfly should lie as shown in Fig. 20 (A).
Rice. 19 a. Butterfly alignment:
A - E - successive techniques for straightening the right side of the butterfly
Now the paper is pulled even tighter and its lower end is pinned. After this, they begin to spread the wings of the other side. Then a wide strip of paper is placed on the wings of both sides so that the wings do not wrinkle (see Fig. 19 b). The antennae are pulled parallel to the front edge of the wings and also pressed with a narrow strip of paper. The general view of the butterfly when straightened is shown in Fig. 18, and in Fig. 20 shows correctly and incorrectly straightened butterflies.
Rice. 19 b. F - beginning of straightening of the left side;
3 - straightened butterfly (the wide strip of paper on the right side has been removed)
The spread wings of the butterfly should be horizontal. They can be slightly raised when straightened upward (when removed from straightening, the wings can drop slightly, this technique allows you to maintain a horizontal position), but in no way should the wings be allowed to sag, that is, so that their base is higher than the edges.
The butterfly is kept straightened for 10-15 days, until it is completely dry. The dried butterfly is removed from the straightening, carefully removing the paper strips. Poorly straightened butterflies can be straightened by first steaming them.
Rice. 20. Correctly (A) and incorrectly (B) straightened butterflies
During straightening, the butterfly is taken with tweezers (butterflies should not be touched with your hands at all). The needle must be inserted carefully into the vein or slightly behind it, so as not to tear the wings.
Dragonflies and mayflies are straightened in a similar way. If they want to have a beetle with spread wings, then they spread it on a peat (cork) plate or on a specially made spreader, since a regular spreader is unsuitable for beetles. Very small beetles, like bedbugs, are usually glued onto very thin pins instead of being pinned. Rectangles or triangles of certain sizes are cut out of good, dense and very smooth white cardboard (Fig. 21).
Rice. 21. Sticking and pinning small insects:
A - B - gluing on triangles;
G-D - gluing on rectangles;
E - impaling very small insects on the “minutiae”.
Methods of gluing are shown in the figure. The insects are glued with some kind of glue: 1) gum arabic (not purchased, but home-made), to which a little glycerin is added (enough so that the composition, after drying on the paper, does not crack when folded and so that it does not dry for very long); 2) syndeticone (real!), diluted with weak acetic acid; 3) cherry glue (prepared like gum arabic); 4) celluloid glue - a solution of celluloid (photographic film) in acetone or, which is much better, in amyl acetate (pear essence); 5) as a last resort - liquid wood glue. Use just a little glue so that you don’t waste it on the underside of the insect. When gluing onto rectangles, the underside of the insect’s body is inaccessible for viewing (the legs should be at least slightly removed from the body so that they are visible); When pasted onto triangles, the entire underside of the insect's body can be viewed.
Triangles or rectangles with insects glued on are pinned. If there is a shortage of pins, you can pin several rectangles onto one pin, giving one common label if the date is common for all pasted insects, or placing your own label under each rectangle if there are differences in dates. It is better not to place insects with different geographical dates on one pin.
It's not just very small beetles or bedbugs that are stuck on. You also have to stick on fairly large beetles if their body is very narrow or soft. So, they stick on soft beetles and fireflies, narrow click beetles, small and narrow golden beetles, etc. The abdomen of rove beetles greatly contracts (shrinks) when drying. To avoid this, frozen rove bees, even the largest ones, are immediately glued (always onto rectangles), and it is especially important to glue the chest and the very tip of the abdomen. It is more difficult to “stretch” dry rove bees after soaking, but you have to do this too: carefully stretch the abdomen, trying to give it normal size.
In order to remove a glued insect from a piece of cardboard if necessary, you need to soften the glue. This is achieved either by steaming (gum arabic, cherry glue, syndeticone, wood glue), or the dried glue is carefully dissolved (softened) by adding a drop of solvent to it, for example, for celluloid glue - acetone or amyl acetate.
Very small insects (of all orders) can be pinned onto special very thin short pins, the so-called “minutia”. These pins are stuck into small pieces of cork or the core of an elderberry, sunflower, or into a piece of cardboard, and the latter are then pinned onto an ordinary entomological pin. This technique is very painstaking, but all parts of the insect are quite accessible for examination (Fig. 21).
Insects intended for biogroups are not pinned, since pinned insects are unsuitable for these purposes: a pinned insect cannot be placed in a biogroup, and an insect removed from the pin will have a visible hole from the pin puncture. Therefore, only insects stored on cotton wool can be used to produce biogroups. When spreading, such insects are first secured to the spreader by pinning their body with pins.
Etiquette
Each pinned insect (like any object of any natural history collection) must have a label with a precise indication of the location (geographical point - name of the settlement, district, region; this information is required), time, surname of the collector and all other data, if those are needed and available (catch conditions, food plant, station, etc.). Labels are written in ink on possibly small pieces of thick white paper. You should never write labels with ink, especially colored ink: over time, the ink fades and the insect turns out to be devoid of a date, that is, it has lost all scientific value. For large collections, it is most convenient to use typographic labels (set in the smallest font, or a cliche is made that allows you to give a font much smaller than any typesetting one). When composing the text of labels, you should avoid abbreviations that are difficult to decipher and all kinds of symbols. You cannot store pinned insects without labels (with one common label on the box or inside the box, or a common label for a number of insects in a box, etc.): such insects very easily become deprived of any dates. The most correct thing is to label the insect immediately after it dries after pricking.
It is better to pin labels on a pin at a certain height. This is easy to do (if you can’t do it by eye) (using a “ladder”, in the steps of which holes of varying depths are drilled.
Drying an insect
, you can not only leave a small piece of summer and preserve good impressions of your vacation, but also create an original souvenir. Let's talk about how to do it right. It's better to start by making a frame. To do this you will need wood or plywood, cardboard, glass, foam, paper and glue. First, 4 bars are cut out of wood or plywood - the basis for the frame. They should have the same width both on the front side and on the sides, and the length can be any. The ends of the bars must be cut at an angle of 45°. The smoother they are sawn off, the better the edges of the bars will meet when forming the future frame. It is necessary to make two cuts on the inside of the block along its entire length. One cut is made to insert glass into it. It should be slightly wider than the thickness of the glass so that the glass can be inserted easily and hold well. Another slot is needed to insert the back wall with the dried insect placed on it. The entire structure is secured using fasteners - thin metal plates pre-inserted into manufactured bars. To reach the back wall of the frame, these plates can be easily bent. The back wall is made of cardboard or thin plywood. In the center of the wall you need to make a rectangular cutout into which a foam plastic plate slightly larger than the cutout is attached, glued from the back of the back wall. Next, a beautiful fabric is glued to the back wall to give the frame a beautiful look. After this, we insert the glass into the frame, glue the bars with PVA glue and after the glue dries, we clean the frame with sandpaper. The frame is coated with furniture stain to give it a brown tint, and then several times with colorless varnish. Moreover, before applying each coat of varnish, you need to wait until the previous one has dried. When the varnish is dry, the frame is treated with fine-grained sandpaper. The coating is repeated 2 times, and the 3rd time the frame is simply varnished. The caught insect is killed in the stain. Strips of paper are placed at the bottom of a wide-necked jar, which are not needed when drying butterflies. The jar is closed with a lid, to which a cotton swab moistened with ether is attached to the bottom side, and left closed for several hours. Then the insects need to be straightened out immediately and pinned onto entomological pins before they dry out. For butterflies, flies, bees, wasps and dragonflies, pins are stuck vertically into the chest, and for beetles, grasshoppers and bedbugs into the right elytra. Next, wait for the insects to dry. The wings of the butterflies are carefully straightened, secured with strips of paper. To prevent the legs and antennae from breaking, they need to be positioned closer to the insect’s body. Next, we place the dried insect on the foam plastic of the back wall of the frame and glue a strip of paper with information underneath it. We insert the back wall with the insect into the finished frame and bend the fasteners.
When dried, some insects greatly change their color and fade. You caught several bright red ladybugs, killed them, and laid them on mattresses. After a while we got ready to prick the beetles, opened the mattress - how they had changed! Where did the magnificent red color go?! The beetles acquired a dull, dirty-brown color. When dried, green grasshoppers turn brown, and dragonflies lose their blue stripes and spots. Is it possible to prevent color change and fading in dry insects? Unfortunately, there is still no method of pickling and drying insects that would preserve their original color completely and without changes. We are not even talking about the fact that in alcohol or formalin during long-term storage, insects generally lose any semblance of their natural color. However, there are some ways to preserve color close to natural, although they are rather imperfect. Leaf beetles and ladybugs change their color much less if they are marinated not with ether or chloroform, but with snuff. To prevent the disappearance of the bright pattern on the sides of the pectorals and abdomen of dragonflies, they are treated with acetone. As soon as the insect falls asleep in the stain, it is taken out, holding it by the wings folded together, and lowered into acetone so that the head does not submerge in the liquid. The dragonfly is kept in acetone for about 2 hours, after which it is transferred to ether for an hour. The insect removed from the ether is dried and placed on a mattress. Preserving the pattern on the chest of dragonflies is important not only to better preserve its appearance, but also to make it easier to identify later. Coloration is an important identifying feature for many of these insects. It is almost impossible to avoid browning of the color of locusts, grasshoppers and other orthoptera. The only thing that can be advised here is to dry them as quickly as possible.
Mummification of larvae and pupae
To prepare biological collections, it is often necessary to prepare a dry preparation of a particular animal. An example would be a collection dedicated to the development of an insect. All stages of its development should be located next to the dried and straightened adult insect. Larvae stored in bottles or test tubes with preservative liquid, of course, make less impression than dry objects. In some cases, larvae and pupae that do not have a dense chitinous covering cannot be dried as easily as adult insects, but mummies can be prepared from them, that is, mummified. Mummification takes a long time, so it is convenient to make mummies from a large number of animals at once. Usually only white larvae and pupae are mummified, since the colored ones lose their color. To work, you will need alcohol of 60, 75, 85, 96 and 100 degrees (for the preparation of alcohols of the required strength, see page 120), xylene, small tweezers, several salt shakers closed with glass. Instead of salt shakers, you can use any small vessels with a wide neck. Before killing a caterpillar or other larva intended for mummification, it should be thoroughly fed. Hungry caterpillars and other larvae may shrink during subsequent processing. The fed larva is pickled and scalded with boiling water, after which it is successively placed in alcohols of increasing strength: 60, 75 degrees, etc. The larva is kept in each alcohol for 1 to 2 days, depending on its size. The latter alcohol is absolute, that is, it contains no water at all. It needs to be changed once or twice. While in alcohol, the animal's tissues become dehydrated. The more thoroughly the dehydration is carried out, the better the next operation - degreasing. To degrease, the larva is placed in xylene, where it is kept for approximately the same time as in absolute alcohol. When removed from xylene, the larva becomes dry and hard. Now it can be stored together with dried adult insects.
When transferring an object from one liquid to another, it is picked up with tweezers. In this case, you should try to keep the larva in the air for as little time as possible, since this will allow the moisture in the air to penetrate into it. All vessels in which mummification is carried out must be tightly closed (Fig. 34). There should be enough liquid in each of them so that it completely covers the larva. Both alcohols and xylene should be replaced with fresh ones from time to time, as moisture, grease, and dirt accumulate in them. Sometimes the larvae, when passed through alcohol, shrink and lose their shape. Most often this is explained by the fact that the change in alcohol strength turned out to be too drastic for them. If for large and rough larvae it is enough to use only four alcohols - 60, 70, 96 and 100 degrees, then more delicate animals have to be passed through six - eight alcohols, for example: 45, 50, 55, 60, 70, 80, 96 and 100 degrees. In conclusion, it is necessary to say how to prepare absolute alcohol from commercial alcohol (96°). To extract water, dehydrated (white) copper sulfate is added to alcohol. Dehydration of vitriol is achieved by calcining it - the blue crystals lose color and turn into white powder. About a third of the volume of a jar with a ground stopper is filled with copper sulfate powder, after which alcohol is added to the jar. The vitriol greedily absorbs water and turns blue. There is practically no water left in alcohol. This alcohol is poured into another vessel containing white, dehydrated copper sulfate. Be sure to store absolute alcohol together with vitriol in a tightly sealed container, making sure that the vitriol under the alcohol remains white at all times.
Advice: Large and medium-sized ones with a more or less dense chitinous cover are stored dry.
The site has:
Preparation of wet preparations Methods of designing zoological collections Features of collecting aquatic animals Collecting arachnids for the collection Arranging butterflies for the collection
Thematic materials:
How to prepare a delicious pumpkin salad Is it possible to freeze mushrooms for the winter in the refrigerator and how to do it correctly at home How long to boil porcini mushrooms before freezing The ideal girl through the eyes of men Proven and most effective methods of saving water - I’m sharing! How to make Hollywood curls Women's Hollywood haircut Face alignment. Relief leveling. Evening complexion in the salon and at home - methods and recommendations of specialists Lipoma on the labia: what to do and how to treat On the labia, the wen can be removed with a syringe Drinking tomato juice for pancreatitis: restrictions and recommendations
103583
If you notice an error, select a piece of text and press Ctrl+Enter
How to properly dry a grasshopper or praying mantis at home?
Properly dried grasshoppers and praying mantises at home
The main disadvantage of drying a grasshopper and a praying mantis is that it will turn from a green “handsome” into a brown, wrinkled insect. It is very difficult to bypass this process. How to properly dry a grasshopper or praying mantis at home? Important details:
- As mentioned above, it is important that insects do not turn black when dried and retain their color.
- Therefore, before starting the process, it is better to gut them - otherwise they will take a long time to dry and retain an unpleasant odor.
This all needs to be done in the following sequence:
- After grasshoppers and mantises are caught, they are killed in the stain. It is necessary that the jar has a wide neck and strips of paper at the bottom.
- To “stain” you need ether. Evaporate it in a jar, then place the insect and close the container for several hours.
- After this, the insects are immediately straightened and impaled. This is done on the first day, while they are still wet. Otherwise, there is a risk of breaking limbs, and for grasshoppers and mantises this is the most important thing.
- Insert pins into the grasshoppers' right elytra.
- After this, wait until the insect dries.
- The paws should be closer to the body so as not to break them.
Then label the collection and place it in a permanent storage location.
How to dry an insect
So summer is over. Leaves are falling. Let's better talk about how to take at least a little bit of summer with you. You can do this in different ways, of course, but the surest way is to leave good and unforgettable impressions of your summer vacation. But since I am not a professor of psychology and I don’t know what memory will be pleasant for you, I will tell you about simpler and more material things that will leave you with that very particle of summer. In this article we will talk about how to dry an insect, and then decorate such an interesting souvenir.
Let's get started. You, of course, can do whatever is most convenient for you, but I will start by making a frame. Here's what we need for this: - plywood or wood - glue - glass - cardboard - polystyrene foam - paper
It is necessary to cut 4 bars from plywood or wood, which will later serve as the basis for the frame. All 4 bars should be the same width, both on the front and sides, the length may vary depending on what kind of frame you need. Trim the ends of the bars at a 45° angle as shown in (A). The sawing places are marked in red; the smoother you saw off, the better the edges of your bars will meet, forming the future frame. If you sawed off correctly, the gaps in the convergence of the bars will be almost invisible.
Let us now turn to figure (B). It shows a block in which you need to make cuts. The cuts are made on the inside of the bar, the letters “L”, “B” and “O” indicate the Front side, Side side and Back side (back), respectively. A longer slot is necessary for inserting glass into it, so it should be slightly larger than the thickness of the glass so that the glass can be inserted easily and held firmly. A short slot is needed to insert the back wall, on which our dried insect will be placed. The letter "K" in figures (A) and (B) indicates fastenings. The fasteners are thin metal plates that can be easily bent at any time and the back wall of the frame can be removed. The plates are inserted into the bars we made. The main part of the frame is ready.
Let's start making the back wall.
The back wall should fit completely into the slot we made earlier. As you can see from picture (C), there is a slot in the center of the wall into which the foam “P” is attached. The foam plate should be slightly larger than the slot. It must be glued from the back of the back wall, i.e. the side that will be closer to the wall when we hang the frame. The back wall is made of thin plywood or cardboard, after which some beautiful “T” fabric is glued to it, this will give the frame a more presentable look.
Insert the glass into the frame and glue 4 bars with PVA glue, let the glue dry. The frame is almost ready. After the glue has dried, clean the frame again with sandpaper. Cover the frame with furniture stain, this will give it a brown tint. Next, you need to coat the frame several times with clear varnish; between each coat of varnish, wait until the varnish dries properly. After the varnish has dried, go over the frame with fine-grained sandpaper. Repeat coating 2 times. For the 3rd time, simply coat the frame with varnish and let it dry. The frame is ready.
Well, now let's get down to the most important thing.
If you have already caught an insect, then that’s just great. The caught insect is killed in the stain. We take a jar with a wide neck, put strips of paper on the bottom (if you are going to dry butterflies, then strips of paper are not needed), close the jar with a lid, to the underside of which attach a cotton swab moistened with ether, leave the jar closed for several hours. After this, the insects are immediately straightened and pricked for the first day, before they dry out, otherwise some limbs will break. Insects are pinned onto entomological pins. Pins are stuck vertically into the chest of butterflies, flies, dragonflies, bees, wasps, or into the right elytra of beetles, grasshoppers, and small bugs. Wait until the insects dry out. The wings of butterflies are carefully spread on the so-called “spreaders”. First, one wing is secured with strips of paper, then the other. The legs and antennae are placed as close to the body of the insect as possible so that they do not break.
Now we place the dried insect on the foam back wall of the frame. We glue a strip of paper with information about it to the plate under the insect. We insert the back wall, but with the insect, into the frame we made. We bend the fasteners so that the back wall is firmly held in the frame. Our souvenir is ready.
A home collection of insects will increase interest in you when any guests arrive. Such products not only decorate your home, but are also a unique gift for loved ones.
Learn to make things with your own hands.
How to dry a spider for collection?
Dried spider for collection
The best time to catch and dry spiders for collection is in August or September. At this time there are the most mature individuals. For fixation, you can use 96% alcohol or 10% formaldehyde. The smaller the spider, the more difficult the drying process. You should not kill spiders thoughtlessly. In such cases, their limbs bend and freeze.
It is better to put the victim to sleep:
- Place the spider in the jar.
- Instead of a lid, use a cotton swab soaked in formaldehyde.
- After a while, the paws need to be straightened with a pin on the board, that is, straightened.
- Entomological pins must be of standard length and have round heads. Regular ones cannot be used. They rust quickly. This must be done when the spider is already dead. The paws are straightened and fixed. For this you need pins and strips of paper.
- It is important not to break anything for the spider. But at the same time, there should be no contractions in the paws; reliable fixation is also important.
- Spiders should be stored in a dark, dry place.
Here's another way to dry a spider. Also suitable for various beetles. You will need the following:
- A jar that will be used for stain.
- The thicker paper will be used for mattresses and labels, and the softer paper will need to be filled with stain and made into “mattresses”.
- Use ethyl acetate or nail polish remover as a poison.
- You will also need cotton wool, thread, needles and cardboard boxes.
- Containers - plastic and metal.
- You also need glue and binoculars.
Do the following:
- Fill the jar with paper, which must first be cut into strips. You can crumple it up. This is necessary to ensure that the specimens are clean and dry.
- Then add a few drops of the polish remover liquid there. This is an analogue of ethyl acetate. It poisons insects, but does not make the integument fragile.
- Now cut out the bases for the mattresses - you can put a box, for example, of sugar, on the sheet.
- Fold the edges and cut rectangles at the corners. All blades are bent twice - at the edge and after half a centimeter.
- Insects or spiders are laid out on a mattress and mounted on pins.
For each mattress, cut out a rectangle to place on the bottom (thick paper) and a rectangle of soft, thin paper (to cover). There must be cotton wool on top of the dense fabric. Now place the frozen insects. But you can prick them right away. Once the insects are dry, they can be soaked. To do this, the mattress is placed in a closed pan with damp cotton wool at the bottom.
When the insect or spider is dried, you need to write explanations on a covering of thin paper. As a rule, this is the region and the surname of the young researcher. If the type of insect is unknown, you should take a key and find it using identification marks.
Carefully straighten the exhibit
Once the butterfly has died, it must be prepared to be placed under glass before it dries out and the wings freeze in an inappropriate position. An experienced lepidopterist knows this and always has the appropriate equipment at the ready.
In general, various devices can be used. Some people prefer to purchase special ones, which are sold in specialized stores and are quite expensive. Others decide to make equipment with their own hands, at least for the first time, until it becomes clear whether this hobby will be an ordinary, quickly boring whim or will remain for life.
The easiest option is to take a board of soft wood and make a narrow and not too deep slot in it according to the size of the trophy’s body. Any beginning butterfly collector can do this.
Carefully place the euthanized insect on the board so that the body fits into this gap. Now very carefully straighten the wings and press them against the tree. Place a piece of thin polyethylene (a transparent disposable bag will do) or tracing paper on top of each wing and secure with pins. At the same time, try not to bury the body too deep into the gap so that it is at the same level as the wings. Then your trophy will look most elegant and will become a magnificent decoration of the collection.
How to dry a bumblebee: tips
The dried bumblebee for the collection of
Bumblebees and Hornets must first be poured into resin or acrylic for the collection. Simply because a stinging insect is dangerous enough to poke with a pin while it is still alive. Here are tips on how to dry a bumblebee:
- To begin with, the individual should be caught in a container. It can be a jar or a box.
- Plant in a jar of epoxy resin with hardener or acrylic. For this you will need disposable containers.
- Mix the “fill” thoroughly.
- The process itself has three stages. First you need to fill the first layer, put an insect there (beetle, bumblebee, wasp) and pour it. Before this, you should give the beetle the desired pose. The last stage is to fill everything completely.
- After the insects drown, they need to be taken out and spread on the foam with pins and allowed to dry.
Important: The main thing is not to prick yourself on the sting and make sure that the insect no longer shows signs of life. Quite often, bumblebees, bees and wasps can only pretend that they are unconscious, and after a person takes them in his hand, they sting.
By the way, you can give the bumblebee the desired pose with tweezers or another sharp object, even a nail. The main thing is to be careful. The beetle should lie tightly. There is no need to fill it with the entire portion of resin or acrylic at once, otherwise it may move. Watch the video on how to soak and straighten insects. The collector clearly shows this.
How to collect butterflies
For what? Why catch them, the unfortunate ones? Beautiful! No one will argue with this. Nature creates objects no less beautiful than humans, and a collection of butterflies will be a wonderful decoration for your apartment. Original! Indeed, few people have such a collecting object (in the sense of such a hobby). And the perplexed but interested looks that a person with a net receives? Yes, this is a reason for conversation, for getting to know each other! Interesting! The fishing process is incredibly exciting. How many new places will you see! Chasing a rare butterfly, and especially catching it, evokes very strong, exciting sensations. Harmless! Yes, I (a biologist by training) claim that this is so. Nature does not care about the death of individual living beings. Several caught specimens of some numerous species do not make a difference; their capture will not change anything. The environment suffers from toxic gases, urban smoke, landscape changes, and finally, flying airplanes. But not from a handful of butterfly collectors! And this activity is more humane than hunting and fishing. The described collecting technique is extremely simple, even primitive. You will only need a few minimums - a minimum of effort, a minimum of materials, a minimum of time. So, go ahead! Chapter 1. Necessary tools and materials. • Net. It is convenient to catch with a net, similar in shape to the one in the picture on the main page. The material you can use is something like a mosquito net (but not hard), or, in extreme cases, gauze. The mesh is sewn to a wire frame, which is attached (with electrical tape, for example) to a stick. That's all!
Paper bags for transportation. How to make them is shown in the figure.
1, 2, 3 - bend the strip of paper in the right places; 4 - place the butterfly in the bag; 5 - close the bag with the tip of the strip
Iron pins - for example, like this: The same, only with the tops bitten off (you can use wire cutters instead of teeth). Foam pieces wrapped in paper (the paper can be glued with “Moment”). Any sizes, I used 10x7x2cm Paper strips of different lengths and widths - from 0.3x5 cm to 0.6x8 cm. Collector's box. Its appearance depends on your imagination and available materials. Perhaps that's all.
Chapter 2. Fishing and transportation Fishing periods vary significantly depending on the climate. It is best to catch butterflies in the first half of summer, since later they almost disappear. There is a high probability of meeting them near puddles, small ponds, and at the edge of the forest.
To catch a butterfly means to cover it with a net or (if the butterfly does not want to land and flies within the reach of the net of a running person) to drive it into the net. After you have covered it, you need to carefully lift the net. As the unfortunate butterfly tries to fly away, it ends up in the farthest corner of the grid (in general, it needs to be driven there). Now you can take this corner of the net along with the butterfly and try to force the latter to fold its wings.
The next step is quite simple. With your thumb and forefinger, grab and lightly squeeze the breast of the butterfly so that you feel resistance but do not hear a crunch. It must be said that there are terribly harmful butterflies that flatly refuse to fold their wings and even spread them on purpose. You can take this one by the head and top of the chest with your fingers (carefully!) and force it to fold its wings. With luck, the scales on the upper surface of the wings will remain intact. All these operations are done through the mesh. By squeezing the butterfly's chest, we kill it or paralyze it. The duration of compression depends on the size of the butterfly and is 7-10 seconds for small ones, and up to 30-40 seconds for large ones.
Now release the net, and the paralyzed butterfly with folded wings will fall into your palm. Open the paper bag you prepared in advance, place the butterfly there, and the bag in some kind of plastic or jelly box to prevent compression. In this state, the insect can be stored for half a day, but the less, the better. After finishing the hunt and returning home, you need to proceed to the next stage - dissection.
Chapter 3. Dissection The main thing in this matter is accuracy. So you can’t immediately explain how to make a butterfly lie down beautifully :-)… In general, we arm ourselves with pins (one in each hand) and begin to straighten the wings on a piece of foam plastic described in the materials. It will be difficult at the beginning, especially if your hands are shaking, but after some practice (on widely distributed and even low-value butterflies, such as cabbage whites), everything will work out.
I start by taking a butterfly with folded wings by the breast with the index and thumb of the left hand (for left-handers - the right hand) and from above, between the wings, pierce the breast with a shortened pin (without a head) so that this pin passes through the body from top to bottom and protruded about 1 cm from below and about 1 cm from above.
Then we take the pin with the butterfly strung on it by the upper protruding tip and stick it into the foam until the breast of the butterfly touches the surface of the foam. Between the front and rear wings of the butterfly I stick several pins into the foam at different angles (20...75 degrees). By doing this I achieve its fixation on a piece of foam plastic - so that it lies as firmly as possible. Then I take a previously prepared strip of paper, place it across one of the front wings and prick a pin (sometimes two at a time) near the edges of the wings - something like this:
When a strip of paper is placed on the wing, you need to pull it a little and immediately insert pins along the edges. I do the same with the other front fender and both rear fenders. Now you can pull out the fixing pins that were previously pinned at an angle. You can also pin a few more pins to the foam to secure the body (especially the abdomen) and antennae of the butterfly.
All! The work is finished, all that remains is pleasure. We leave the butterflies in this position for 3-5 days (depending on their size) to dry. It is convenient to put pieces of foam plastic with pinned butterflies in a cardboard box with a lid - so that some insect does not eat them.
Chapter 4. Formation of the collection (layout) In the city of Khimki, kitchens made of good quality plastic were brought for sale. How you design your collection is up to you. Dried butterflies can be removed from a piece of foam plastic by first removing all the pins (except the one on which the butterfly is strung) and removing the paper strips. Pull the protruding end of the main pin and the butterfly is in your hands, ready to move into a collectible box - a “butterfly box”. If the butterfly on the pin does not want to come off the foam, the end of the pin can be gently pulled with some forceps, pliers or teeth.
My butterfly maker (more precisely, one of them) is a wooden box with a glass front wall and a “tray” extending forward, to which a 1 cm thick layer of foam is glued. The look and design of your butterfly holder depend on your ingenuity and imagination - on your Smart hands . After all, stores don’t sell butterflies, much less ready-made collections (true, sometimes you can see huge tropical butterflies in cardboard boxes, but they are very expensive - I mean, the cost is high. Do we need this?). Therefore, your collection is initially unique. Good luck!
How to decorate a collection of insects with your own hands: ideas
There are more than a million species of insects in the world. Each of them is truly unique. A collection of insects, even collected by an amateur, also has its value. This is why many people are interested in creating collections. It is important to arrange it correctly so that you can display it or simply store it. Below you will find ideas to help you decorate your insect collection with your own hands.
The simplest option is to place the insects on a paper mattress or foam, place them in a frame and cover them with glass.
DIY insect collection
Here are the original collections of butterflies.
DIY insect collection
DIY butterfly collection
You can create compositions using jars and glasses. Also use dry branches, moss and other natural materials.
DIY butterfly collection
In the middle you can place the most beautiful and rare beetles, which will be the center of attention.
DIY beetle collection
Large dried insects look beautiful in separate glass containers.
DIY beetle collection
In one large box you can make sections, in each of which you can place insects from a separate region.
DIY beetle collection
Is it possible to transport collections of dried insects to the Russian Federation purchased abroad?
There is a lot of controversy over whether it is possible to transport insects purchased abroad to your homeland. On the one hand, customs may not look at the contents of your hand luggage. But it is better not to transport them in alcohol. Since it is prohibited to bring liquids with a volume of more than 100 ml .
- Insect collections are often transported in the luggage compartment. Naturally, in some cases the legislation requires a special permit for the transportation of animals.
- But some naturalists manage to ignore the “voice of the law” and transport their collections in some kind of container (for example, inside a guitar or double bass), thereby ignoring paperwork.
- Naturally, airport workers can detect this and then they will have to answer according to the Law.
In the question “is it possible to transport collections of dried insects to the Russian Federation purchased abroad”, everything depends on many factors:
- Number of insects in the collection.
- Their uniqueness and value for the state from which they are exported.
- Availability of permission and accompanying documents.
- Individual airline requirements and other conditions.
Therefore, before transporting your collection, you should consult the airport help desk or call the operator at the airline’s phone number. They will answer all the necessary questions and explain the conditions for transporting certain luggage or the contents of hand luggage.
Where can you see real state collections of insects collected by scientists?
A real state collection of insects collected by scientists
You can see real state collections of insects collected by scientists in museums. As a rule, these are the works of entomologists - specialists in their field. Sometimes, in order to obtain a rare adult, they go to distant, exotic countries and spend more than one week on expeditions, overcoming hardships and hardships.
Zoological museums with huge collections of insects are available in Moscow and St. Petersburg . There are also in other cities, but they are not so grandiose. The insect collection in St. Petersburg is more than 300 years old and contains about 8,000 rare specimens .
A collection of insects in glass: why you can’t keep them at home according to Feng Shui?
Collection of insects in glass
Keeping insects in collections in glass at home is prohibited according to Feng Shui. Why? Here is the answer:
- Non-living organisms can change the energy in the house, which will negatively affect the life, health and well-being of the entire family.
- It is the influence on the energy background that is of great importance. Despite the fact that insects can be minimal in size, even such beetles, moths, butterflies and other insects transmit very powerful negative energy. She shouldn't be in the house.
- Dried insects can affect human health and make sleep worse.
- Moreover, frequent conflicts, quarrels out of nowhere, and misunderstandings with loved ones are possible.
Therefore, you should think many times before bringing a collection into your home.
The story “Don’t catch insects for collections” from Pleshakov’s book “The Giant in the Clearing”: conclusion
Many writers try to convey to people through their works that killing even insects is inhumane and very bad. For example, the story “Don’t catch insects for collections” from Pleshakov’s book “The Giant in the Clearing” is a vivid example of how the author tries to fight for the life of every insect. Here's the story itself:
The story “Don’t catch insects for collections”
The story “Don’t catch insects for collections”
Here is the conclusion that can be drawn after reading this story:
Often schoolchildren try to compile beautiful collections of insects and put a lot of effort into this. However, it should be remembered that in an effort to decorate one’s home or make a report for a lesson, a person causes undeniable harm to nature. After all, it deprives it of rare species of insects, many of which are doomed to extinction.
That is why this activity can be called not only inhumane and cruel, but also wasteful. Indeed, in this case, the “researcher” does not give anything to the world around him, but only takes from it.
If you want to look at dried insects in collections, it is better not to make them yourself. Go to a real Zoological Museum and see the unique works of professional scientists. There you can find many rare species and really learn a lot more about the world around you than drying beetles, butterflies and other insects yourself.
Who collects such collections and why?
First, let's figure out what a butterfly collector is called. Everything here is quite simple, although it is difficult to pronounce this term - lepidopterophilist. So, if you want to seriously engage in such a hobby, you will have to practice in order to pronounce your new status without hesitation.
It is also clear why a butterfly collector is engaged in this business. Still, not many representatives of the fauna on the planet can boast of such diversity and beauty as these insects. True, their beauty is short-lived - some butterflies live only a few days, or even hours. There are breeds that don’t even have a mouth, since they never have to eat once in their entire lives. But under glass, these fluttering flowers can be preserved for many years and even decades. In addition, this is a great way to learn more about wildlife. Therefore, this hobby can be recommended to both adults and children. Of course, there is a lot to know before you do it.